Thursday, June 18, 2026

Time passes

It's eight years since I posted on this blog. Seems longer and yet oddly not that long ago. So the news is that I've just shot a few rolls on the RZ in Alaska and this time I sent them out for developing.  Don't have a good darkroom setup here yet and the last roll I processed I messed up trying to get the film loaded into the spool.  Since I'm not going back to the Meade glacier any time soon I did't want to spoil another roll.  

And I've just bought a used Mamiya M645 Super!  Very excited. It's in beautiful condition. The 80mm f/2.8 lens is arriving in a couple of days.  Compared to the RZ it's incredibly light. And it has TTL metering and an auto winder with 16 frames per roll so more like a 35mm shooting experience but with medium format negs. I've already loaded a roll of Across 100 and am really looking forward to running the first roll though it.    

It will be more like a point an shoot (which may be a problem since I'm using TMX 100 120 film which isn't cheap).   

Sunday, May 13, 2018

Action still photography

Modern digital cameras are now shooting video at 30 frames per second at a resolution that single still images can be picked out and used at a resolution suitable for large prints. The result will be the de-skilling of sports action photography. The evolution began with motor drives; instead of having the skill to anticipate and then perfectly time a single exposure photographers could press the button and capture 30 images at 10fps and one might capture just that critical moment when the ball crosses the line or strikes the racquet. Now, instead of looking through a series of still images, photographers can replay the video in slow motion, stop at the point where they see a good still and pick that fam in the video. While there is still some skill involved in composition, that involved in capturing the image in the first place is rendered moot.       

Tuesday, February 2, 2016

Farewell, Olympus

My first camera (aged about 8) was plastic affair made by Kodak that took 120 film I think; a present from my aunt, Itta. I have no images of that camera to post though it's remarkably clear in my mind's eye.

Halina Paulette Electric, circa 1970
Next was my first 35mm camera, a Halina Paulette Electric, my first with a light meter. The lens wasn't anything to write home about, and I remember the focusing ring being quite stiff. And I had to guess the distance to the subject.


Nikkormat FTn, circa 1975


At about age 16 I graduated to my first SLR, a black Nikkormat FTn with an f2 50mm lens. Raul Casares, who among other things, did photographic work for Gulf Oil in the UK, used Nikon and recommended it. It was heavy, but well built. It was after all, a Nikon. My first lens was a Soligor 90-230mm zoom. I also borrowed my father's Sunagor 200mm telephoto from time to time.

Behold, Olympus!

Olympus OM-1n, circa 1980

With the announcement of the OM-2 in 1975 (I can still see the brochure - a black OM-1 on a black background, really elegant, great marketing!) Olympus began to appeal to me (and my friend David Gould) as a camera brand. It was advertised as having a 20% brighter viewfinder, and being smaller, and lighter than any of its competitors.

David bought an Olympus OM-2 in about 1978, but it wasn't until I went to Imperial in 1989 that I got mine. Actually its wasn't an OM-2 but a second-hand black OM-1n with a 50mm f1.4 for about £125. In today's money that's an astounding $1,037 (what was I thinking?). I lent it to Andy North in 1980 who left it in his (unlocked) room from where it was stolen.

So I went back to Foxes and bought another OM-1n, this one silver. That camera still I have today, so it wasn't that bad a long term investment ($103/year over it's working life). It went to the Sahara (where sand got into the lens so the focusing was a bit crunchy for many years). The light meter gave up the ghost about 15 years ago but the shutter still works

Olympus OM-2sp, circa 2000
In 2000, I discovered eBay and when the OM-1's meter gave up, I bought two OM-2-SPs, one for color and one for black and white and another 50mm f1.4. I think I paid less than $100 for each body. Over the years I picked up some  Zuiko lenses; 24mm, 28mm, 135mm, 35-105mm, 85-250mm zoom.

I loved these cameras mostly for nostalgic reasons (Finally, 35 years on, I had my own OM2). But I hated the battery drain; even switched off, the batteries would go flat in about 3 months. Given that I was taking pictures fairly infrequently, that meant that they were almost never ready when I needed them.

Going Digital


Since then, I have made three purchases in the digital realm; a Nikon Coolpix S200 which was fantastically small but had a fairly ropy lens.

Panasonic Lumix-LX3, circa 2010
Next was a Panasonic Lumix LX3 which was larger but with much better optics. The lens was a little limiting, 60mm at the long end, but it was much sharper and didn't have the distortion that plagued the Nikon S200.
Panasonic Lumix-LX7, circa 2013


When the LX7 went on sale about 2 years ago, I sold the LX3 and bought an LX7.

The lens was a stop faster and now went to 90mm. This was a perfect zoom range for me; a good wide-angle (24mm is much wider than 28mm) to a portrait-length telephoto.

It is a really great little carry-around camera and I take it everywhere.
 

More Pixels


About 4 years ago I was thinking about getting a Sigma SD1 which had been rumored before its launch to be priced at just under $2,000. When it was announced, Sigma set the price at $10,000 so that was out of the question; instead I bought a second-hand Mamiya RZ67 for about $200 (and started this blog). But I still had a soft spot for Olympus and a hankering for the OM-D EM-5 which had been announced at about the same time.

Recently B&H put the original OM-D E-M5 on sale. I went to dpreview.com and scrupulously studied the reviews;  I looked particularly closely at the studio scene and compared the images made with the E-M5 with a wide variety of other cameras. I used the Nikon D810 as the 'reference' image - what the best digital imaging could produce - and my trusty LX7 as the baseline.

Of the many comparisons and alternatives the E-M5 seemed, to my eyes, to hold up extraordinarily well. The amount of detail it appeared to resolve was remarkable. Finally, it seemed, this was the digital camera I'd been waiting for.

So I bought one as a birthday present. My birthday was last week and with great anticipation I opened my present and began to take some test pictures. Last Friday I decided, I'm not quite sure why, to to an A-B comparison with my LX7. Really it was just a bit of a lark to see how much better the E-M5 was than what I had been used to. That turned out to be a bit of a shock.

Breakup


These are crops from files taken with the OM-D and the LX7. It was dusk and the sun was setting.
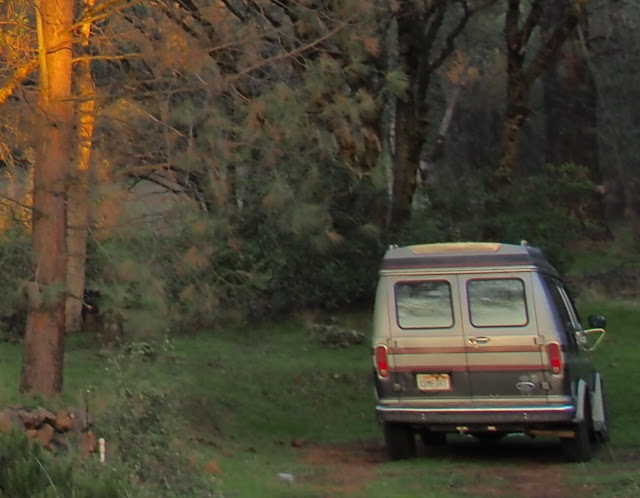


The image above is the OM-D E-M5.
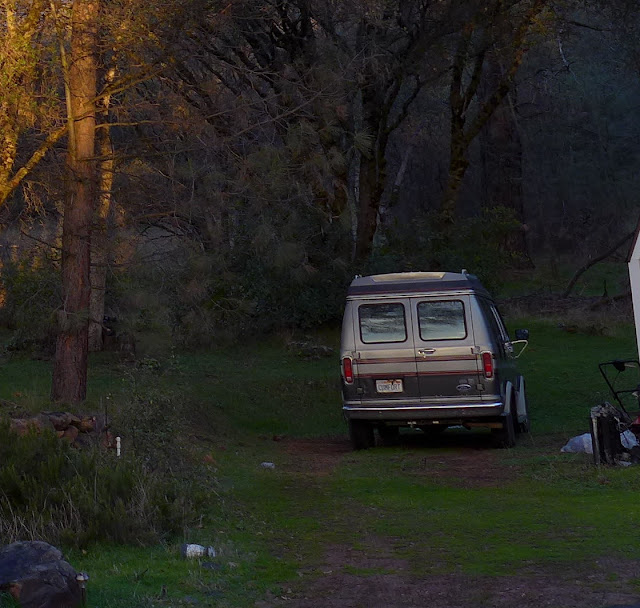


This is the same scene taken at the same time with the LX7.

These speak for themselves I think (If you click on each you can see a slightly larger version). The OM-D looks like someone has taken the Photoshop smudge tool to it - the pine needles have all been smeared into an amorphous green mass and the bark on the trees has no texture.  The LX7 on the other hand preserves more detail despite being a smaller file.

B&H were of no help; reset all the camera settings to the factory defaults was their best advice (I shouldn't be surprised - it’s a high volume operation). Anyway, I did that but the results were no better. So my love-affair with Olympus came to an abrupt end. The camera was RMAd and sent back yesterday.

I had, at one point, thought about using my old OM series lenses on the OM-D but the micro 4/3 sensor made that awkward - my OM 24mm f2.8 would be an f5.6 standard prime and I'd have no wide-angle. That, combined with the outrageous cost of the adapter ($152), made this a bit of a non-starter.  Since Olympus looks committed to the micro 4/3 format and unlikely to produce a full frame camera, any hope of using the old lenses looks forlorn.

Along the way, for no good reason, I'd bought a Nikon F5 - the company's last professional film camera.  The lens (Nikon AF-S NIKKOR 24-85mm f/3.5-4.5G ED VR) I found reconditioned for about $350. It isn't professional grade, but DXOmark gave it pretty good rating compared to say the Sony FE Carl Zeiss Vario-Tessar T* 24-70mm F4 ZA OSS which costs about $1,200. The professional grade Nikon AF-S NIKKOR 24-70mm f/2.8E ED VR is faster and sharper, but at $2,400, is almost seven times what I paid for the 'kit' lens and until I win the lottery, unaffordable. (Of course there is the Tamron SP 24-70mm f2.8 which according to DXOmark is better than the equivalent Nikon and half the price, but it’s still outside my budget for the moment).

So my plan is to sell all my Olympus equipment (except perhaps the 1980 OM-1n) and eventually get something to use with the Nikkor 24-85mm, probably a second-hand or reconditioned D610 or D810. Since I don't have to buy a lens, that would be cheaper than a Sony A7R with the Vario-Tessar T* 24-70mm lensl; and it's a Nikon so built like a tank.

But that's some way off. This was about my breakup with Olympus. It's been a 40 year relationship but now it's over. And another valuable lesson learned was not to trust dpreview.com's reviews alone. Perhaps they mislabelled the file, but their test look very different from what I found. There is, ultimately, no substitute for shooting ones own test images.

Sunday, June 14, 2015

Time flies


I looked back today at the last roll of 6x7 I developed - it was a year and 10 days ago! That's pathetic. I've been so engrossed in testing and calibration that I haven't taken any pictures; which is a pity because that's what this was all in aid of. Anyway, here's a roll I developed this evening. I quite like the boot and tire (top left). I may re-do the trucks (if they are still there) to lose the white car on the left (which isn't).

Tuesday, April 7, 2015

Odessy over

About 10 months ago I began thinking about how to calibrate my film, much as one might a printer or a display. Yesterday that journey reached its destination. I now have a process that generates a digital file that fairly accurately represents the incident light at exposure, and backs out the characteristics of the particular emulsion use to capture it.
Kodak TMX 100 for 7 stops either side of middle grey
After working on the problem on and off for a while I have now managed to think through how to use this information to 'linearize' the scanned response for any given film and any exposure.

Initially, my approach had been to measure the scanned output for each 'zone' and create a series of correction profiles for any given exposure. If, for example, an image had tones ranging from 4 stops under to 2 stops over middle grey, I'd create a profile for that specific exposure range - in other words for every combinations of black at one end and white at the other, I'd produce a profile for the particular exposure on that film.

Clear this was unwieldy. To start with it quickly filled up the scanner software with a huge number of profiles for just one film. Second, it took a long time to generate all the profiles. Each had to be scanned, the peaks found and put into into a spreadsheet from where the individual profiles were built. Third, it was limited to incremental zones (exposure stops) and didn't cater for exposure ranges that lay between stops. This wasn't so much of a a problem in the shadows but was critical in the highlights where densities are very close together. So I spent several months wondering if there was an better way. In the process I wrote a program for detecting peaks in a test image which helped a great deal, but it was still cumbersome.

Ideally I wanted to simply take the 'master' profile for the film and generate a correction curve for the portion of the emulsion that was used in any given exposure. That would avoid having to choose between two profiles neither of which exactly matched thee exposure I was scanning. The first step was to fit a 5th order polynomial to the film's response curve. The fit was excellent (R-sq = .9997) and allowed me to predict the emulsion density for any given level of exposure.

However what made the end-to-end generation of a correction profile difficult was the logarithmic mapping the scanner used to turn the densities into output levels. The profile of that mapping depended on its breadth and, importantly,  how close to the white end of the range the image input range was set to.

Realizing the mapping was a log function was a breakthrough and allowed me to define a function that accurately captured Epson's mapping. Armed with this function I could now accurately predict, for any given range of exposure in the image, where the scanner would put a given zone on an 8 bit intensity scale (0-255).  Knowing what the output would be I could compare it to what it should be; even increments for each zone.

Once a film has been tested and measured (once only) the master profile function and the log mapping function are used together to generate a new correction profile - on demand - for each new negative to be scanned.

The process works like this; an image is previewed on the scanner. The density values of the darkest and brightest points are noted, defining the tonal range in the emulsion that has been used. Using the log mapping from the film's master profile, the scan levels this would generate are calculated for 15 equal steps from the darkest to the lightest values. These are then used to create the correction curve which is written to the Windows registry. The scanner software is restarted (it only reads from the registry at start up) and the newly generated correction profile can then be applied to the image.

This is one example taken from the underexposed end (-6 to + 2). The top strip show the scan without correction.


 The next show the same strip with the correction applied.


This experiment was done at the low end of the tone curve where the effect is most noticeable. Middle grey without the correction is at 102 which is about a zones below where is should be  at 128  After applying the correction it appears at 126, almost exactly in the right position.

Some might suggest that photography isn't a science and this is way too clinical. And that's probably quite right; after applying this approach to a portrait recently, I preferred the version that I'd done without the aid of all this manipulation.

So why do it? Partly it was the challenge of seeing whether I could indeed generate an exact tonal representation of the scene by correcting for the characteristics of the film. And it may be completely pointless without taking into consideration the different way the eye registers brightness at different light levels; and most people don't see the world around them in black and white anyway, so a black and white photograph is already a distortion, the creation of something one doesn't normally see. To a photograph is as much about the affective response as it is about the exact replication of the  original scene.
      
Nevertheless, in the process I've learnt a bit about properties of TMX100 (which is a really wonderful film - I really hope Kodak Alaris doesn't stop making it). It's also a more reliable (or at least constant) starting point for any manipulation done by eye. I know that if I over or under expose, I won't be having to deal with the way the film has altered the tonal balance differently in the high registers from the low ones. Even if I seldom use it, at least I now know that if I want to, I can faithfully reproduce the light levels in the original scene in a digital file.

It's the odd-shaped spanner sitting in the tool box, the one you bought for a particular job; you may never use it again but it's nice to know it's there.  

Saturday, February 7, 2015

News flash

In order to calibrate my cheap and cheerful new monolights, I took a series of pictures with my LX7 at a variety of different settings on the (un-calibrated) power dial. I used GIMP to measure the intensity of the same spot in the scene at different power levels, and plotted these against the angle of the power knob. I then fitted a quadratic model to get the angle as a function of the GIMP intensity and intensity squared. Next I took a series of shots of the same scene with different apertures to find the GIMP 'intensity difference' associated with a one stop change in exposure. Using this values I plotted the angle either side of the mid-power-point (knob set vertically) at 1/3 stop intervals; that's how this image was created. It shows the angle I need to set the power knob to on the flash unit to get more or less power in 1/3 stop increments. Note that it's not linear!

Why do all this? Well, my LX7 only stops down to f8 so I can't test the exposure below f8; and my Schneider 150m is f5.6 full open so I'd like to be able to use more stops than just f5.6 and f8. Which means I need to up the flash intensity and stop down the lens from an exposure I've tested with the LX7.        

Armed with this handy cheat sheet, I set about testing my theory... 

...and this was the result. The negative appears a little underexposed. Shadow deatil has been lost, the mid tones are not where one might like at around zones 4 to 6, and the highlights lack clarity. In fact the only thing that is visible (just) is  'Kodak 100TMX'  at the top.

My first thoguhts was 'did I load the holders green side up'.  If so how many holders would I ned to check?

Then I remembered something about flash synchronization. And the answer was I had not set the shutter to 'X' so it was triggering the flash before it opened (which was what you needed to do with flash bulbs and presumably powder before them).  I went back and took four more using the my flash power cheat sheet at different exposures (with the shutter now set to X!) - and they were indistinguishable in terms of exposure!   And since I was doing a portrait for a friend the day after, that was a worthwhile experiment.


Sunday, December 14, 2014

Dilute Xtol keeps fairly well


Two useful lessons this week. First, the film ran off the end of the spool so I couldn't rewind the file without opening the back of the camera. Next time make sure to use masking tape to secure the film; that was lesson #1. The second was a pleasant surprise. I hadn't done any developing since July but for some reason had a bottle full of dilute Xtol (1+1). Possibly foolishly, since it was so long that I had no idea what was on the film, I developed the roll of 35mm (taken with the awesome Nikon F5) with it. It hadn't discolored at all in probably 6 months (though the bottle was full right to the brim). And the results (e.g., above) were fine. So I now know that in a air-tight bottle with almost no air in it at all, diluted Xtol keeps very well.

Sunday, June 1, 2014

Calibration

Most of the work I've been doing recently is about process standardization and reproducibility (quality in the operations management lexicon). Last year I systematized the time/temperature calculation creating a web-based app that uses data on the film, developer, dilution and temperature to calculate  the appropriate development time. Hit and miss is (thankfully) a thing of the past. More recently I've been focusing on calibrating the film, much as one calibrates a display or a printer.

Each emulsion responds to light in a unique way. Thankfully Kodak's process control is such that I haven't yet found differences between batches (although I'm not sure the films I've shot weren't actually from the same batch).

To begin I create a negative with bands of different exposure raging from seven stops under exposed to seven stops over. This is about the dynamic range of TMX-100. I develop the film and scan it with a linear tone curve, setting the black and white ends of the output to the darkest and lightest bands on the negative.

I then use GIMP to measure the level of grey the scan has generated for each level of illumination on the negative. From this I generate a series of tone curves (49 in all) for different ranges of emulsion density to compensate for the emulsion's characteristics at different exposures.

For example, one curve might correspond to a negative in which the shadows were 3 stops below middle gray and the highlights 5 stops above middle gray. Rather than labeling them in stops over and under, I label each curve for the range of measured emulsion densities. So in this example, the tone curve would be the one that captures emulsion densities from 143 to 232. (These are all out of 255, the 8 bit tonal representation in the digital image).Doing so allows me to choose the appropriate curve simply by looking at the histogram of the each negative.


TMX-100 measurements


The red line on the chart on the right shows the density of the TMX-100 emulsion for different EV levels. The response is clearly non-linear. At light levels above middle gray, (EV>0) there are only small differences in density; at low light levels the differences in density increase at each step until 5 stops under when they decline sharply.


This suggests first that underexposed areas, the shadows, will be hard to deal with unless the response curve is exactly matched to the exposure; and it reenforces the dictum - "expose for the shadows, develop for the highlights", which helps ensure one doesn't have to deal with the non-linear behavior of the emulsion for very low light levels (-5 EV and below).

The curved blue line shows the intensity of the scanned image for each exposure level. Because the negative was scanned with a gamma of 1.5 the line curves upwards rather than being straight.

Using Microsoft Excel, the tone curves are written into directly into the Windows registry keys for the Epson scanner; when the scanning software is opened the tone curve drop-down box is populated with the generated tone curves. Using them is fairly simple. Looking at the histogram for each negative, the levels for the darkest and lightest points are determined - since each tone curve covers a different range of emulsion densities this measurement determines which generated tone curve to use.

Saturday, May 24, 2014

Atlantis

A quick trip to Florida last week afforded the opportunity to spend a few fascinating and nostalgic hours at the Kennedy Space Center. The star attraction is the Atlantis orbiter, around which NASA has built a fascinating exhibition.

Atlantis (I)
To be within a few feet of the Space Shuttle, the searing heat of re-entry clearly visible in the charred insulating tiles on the nose, was for someone who grew up with the Apollo program, an indescribable experience. 

Atlantis (II)
For some reason I can't explain I was moved almost to tears; three days later I am still left completely awestruck by the monumental achievement of America's space program; and saddened that today we no longer have such lofty goals. 

Saturday, March 15, 2014

Printing (3D)

My 4x5 tank takes 54 fl oz, a bit much if I only want to develop one or two negatives. You can't partially fill the tank because the negatives stand upright. So I decided to try and design a negative holder that would fit in flat at the bottom of the tank.

This is the design. The  bracing struts are hollowed out to reduce the amount of material used (which quickly gets expensive).

The carriers are stack-able and the gaps in the sides are supposed to let the chemicals flow easily into the carrier and over the negative.

The design was created in Sketchup . Using the STL export plugin I created an STL file which I uploaded to Shapeways, a 3D-printing service. I chose the cheapest material (white flexible plastic).

This is the finished tray (actually two stacked together).
The good news is that the plastic isn't affected by developer or fixer. There are however some improvements I'm going to make. There probably isn't enough flow over the negatives - the negative that was in the lower carrier was spotty in places. And the slides are a little thin.

The cost per carrier was $11.55. A much more solid version will come in at $19.04 and I have a design somewhere between the two, with similar sides but stronger bracing ($14.06).

It's not a particularly cheap solution and it will take quite a while to pay for itself in saved developer, but it was an interesting exercise in creating something useful.

Tuesday, August 13, 2013

TMX100 vs LX7

Here I compare the same scenes taken with the Nikon F5 using TMX 100 developed in Xtol and my Lumix LX7. It's not the whole roll but gives one some idea. The metering on the F5 is very good.

TMX100
LX7

Power to weight ratios

The Nikon F5 is a fairly heavy camera, so I began to wonder about the ratio of pixels to weight. Here are the results.  
CameraWeightImage sizeMP / lb
Lumix LX7 10oz10MP16MP/lb
Mamiya RZ (110mm f2.8)5lb 9oz126MP34.7MP/lb
Olympus OM2-SP (50mm f1.4)1lb 15oz8MP43.5MP/lb
Cambo 45SR (180mm f5.6)24lb252MP52.2MP/lb
Nikon F5 (24-85mm f4.5)4lb 6oz8MP41.5MP/lb

1 - Includes the LX7 in lieu of a light meter. Does not include tripod.
2 - Includes tripod, but not case or extra film.
3 - Scanned at 2000dpi.
4 - Scanned at 3200dpi.
5 - Scanned at 1800dpi.

So it turns out that the Nikon has the lowest power to weight ratio, lower than the Cambo SR! The Mamiya does well (though with a tripod it comes out no better than the Olympus).

Friday, August 2, 2013

Middle age

There comes a point where one has to come to terms with a shift in perspective, a sea-change in motivations.

This is it.

Last week, I bought an Nikon F5 and a Nikkor 24-85mm AF VR zoom. I mention the letters... well I'll come back to that. In my defense, I paid less in inflation adjusted dollars than I did for my Olympus OM-1n in 19801. And I didn't even have a job then...

It gradually dawned on me that I have no real photographic use for the camera. I don't shoot much 35mm; if I want good images, I have 4x5 for really big files, and 6x7 if I want quality with something I can walk around with. 35mm delivers less in terms of resolution than my 10MP Lumix LX7 (which I really like). I don't need 8 frames per second (which translates to $4.50 worth of TMX100 in three seconds) or 1/8000th of a second shutter speed; I can even work a rewind lever; you can do it quite easy
If you have any strength in your thumb.

While I do enjoy the process of developing film, that's mostly nostalgia and comes with a penalty; digitally spotting the negatives, which is not that much less tedious than doing it with a paint brush - as on many an evening I watched Derek doing years ago. Anyway, I've already got two very nice and easy-to-use Olympus OM-SP2s that I've had for years were I really going to go back to shooting 35mm. Given that film is getting more and more expensive, I began to wonder what on earth I'd done (or more precisely why I'd done it).

The only reason one is left with that isn't self-justifying post-hoc rationalization is that I'm buying as a collector rather than a photographer. I've always had a bit of a hankering for the F2. I nearly bought one ten years ago at auction (though in hindsight I'm quite glad I didn't). And the F5 I found is a very nice example of Nikon's last heavy duty film camera; not a mark on it. It's got a host of features that presage the flexibility of digital cameras (most of which I probably won't ever use). My MO, where available, is almost always aperture priority, even on the LX7 so P and S aren't of much interest, though M I will need for flash. Double exposure I did and got bored with 30 years ago. I'm too cheap to bracket, and I don't want to spend $240 on a card reader to get the EXIF data out of the camera, though I would if I could find a cheaper way of doing it.

There are some things though, that my older 35mm equipment doesn't have and these may lead me to pick up this camera to take pictures. First, the auto-focus appears to be very precise and while I'm not too lazy to turn the focusing ring by hand, it does mean one thing less to have to do before pressing the button; much more point-and-shoot-like. And it's extremely fast so I don't miss the shot with a moving subject while trying to keep it in focus. That the AF piece.

The other is VR. The only vibration reduction device I've used on a film camera is a tripod. Though I've not yet run a roll through the camera (the lens only arrived today) it's going to allow me to use slower, finer grained film. My current preference is for TMX 100.

Some other nice touches on the body are the built in winder, the automatic setting of the film speed (no more "duh! I forgot to change the ASA"), really easy film loading, a little window in the back so that you can see the film canister that's actually in the camera (avoiding having to stick ends to film cartons into the slot on the back), and a very comprehensive digital display in the viewfinder. All in all it's a very well thought out camera with lots of touches to make ones life easier.

One thing that did surprise me is that the viewfinder is much smaller than the OM-SP2 or the FE. Clearly a design decision was taken somewhere that you had to move your eye too much to take in the entire filed so viewfinder have gotten smaller. I'm not sure I like the smaller viewfinder but we'll see.

I want to pay tribute to Nikon's designers and management for the attention they paid to backwards compatibility. It would have been easy (and almost certainly cheaper) to build new products that weren't constrained by earlier design choices. But starting with the transition to AI lenses in the 1970s, allowing users to preserve their investment in lenses when upgrading bodies and vice-versa, this was, and clearly still is, a central design tenet (and one by the way that IBM didn't understand until it cancelled the FS project at the 11th hour).  So the 24-85mm lens that Nikon only announced in June last year works perfectly on a body the company stopped making nearly 10 years ago. The other side of the coin is that Nikon's design and engineering teams must have had a very long product road map and designed current products with future ones in mind.  In this day and age of built in obsolescence, disposable products and computer software which won't work on last years operating system, that's something to which I think we've become quite unaccustomed.

So although this is really more of a collectible that a tool, for a while at least, it may be my nearest film based alternative to the LX7 (though it's clearly not quite convenient or discrete).

1. I paid £125 for my OM-1n, which I bought used in 1980 from Fox Talbot in Hammersmith. Adjusting for inflation and exchange rates, that's between $644 and $846, depending on whether you apply UK inflation to the pound and then do the exchange at today's rates, or do the exchange at 1980 rates and then apply US inflation. Averaging the two gives $746, more than the $715 I paid in total for a 'new (other)' lens on eBay and an E+ used body from Adorama.

Monday, July 8, 2013

TMAX 100

When my Nikon FE arrived I wanted to put a roll through quickly to make sure the meter and shutter worked properly.  I had lots of rolls of Kodak Gold 200 so I shot a roll of 24 exposures. Since CVS got rid of their film processing last year, I took it down to Walmart (3 more miles, round trip); only to find it too no longer develops on the premises. Inevitable I know, but a shame none the less. I can only hope that film finds the same roll as vinyl; an old technology that comes back in to fashion.

So I needed to do some B&W that I could develop myself. In 35mm, I had some FP4, a roll of Kentmere 100 and two rolls of TMAX 100 that Russell Kord kindly gave 20 years ago. So I put in the the TMAX, which I'd never used before, and these are some of the results.

The top two images both have bits of sky which is where film grain tends to be most conspicuous. The clips on the right of each illustrate how little grain TMAX has. Of course, without a yellow filter, the sky is quite white and grain may be more apparent when it's darkened with a filter. But it's pretty encouraging nonetheless, and seems to be considerably better here than Fuji Neopan. More tests are in order.    


As a footnote, I'm astounded that the film was still good after 20 years of being carted around (and not kept in a temperate controlled cellar).

Sunday, July 7, 2013

Shocker!

No, not Andy Murray winning Wimbledon (thought that's pretty momentous - first Brit to win the men's singles in 77 years); but that my new (old) Nikon is less than an once heavier than my trusty Olympus!

When Olympus launched the OM-1 in 1972 - I remember it like it was yesterday - the big selling points were its size and weight.

The publicity material was stunning. Black lettering (matt) on a black (glossy) background. Only thing missing was the black light lighting up black, to tell you... (for those of you old - and geeky - enough to remember Zaphod and Arthur). But I digress...

I gave my Nikkormat FTn to my father and bought my first OM-1n, used, in 1979. I had that camera for just 2 years until Andy North left it in his room - unlocked - and it was stolen.

The next OM was another OM-1n (£125), again used, from Fox Talbot in Hammersmith.  That camera I still have. It's been through some pretty harsh treatment, particularly the 130F heat of the Sahara desert; not to mention the sand.

Fast forward 20 years and the next OM - well two actually - were a pair of OM-2S' which I picked up for very little money on eBay in 2001. One of those is that pictured here. And in case you're interested, I have found that setting the shutter to 60 mechanical (the red numbers) and the metering to 'Program' does seem to prevent the much discussed battery drain. The current battery has been in the camera for so long - probably 2 years - that I've forgotten exactly when I put it in.

Anyway, in the 34 years I've used Olympus cameras, I've always held onto the belief, as touted in the Olympus marketing campaign 41 years ago, that the OM system was smaller and lighter than it's competitors.

So it came as something of a surprise to find that my new (old) Nikon FE2 which I bought on eBay last week was almost exactly the same weight. With the practically identical 35-105mm zoom lens, the OM-2 weighed in at 2lb 4.8oz and the Nikon at 2lb 5.1oz, less than 1% heavier.

The FE2 doesn't have the OM-2's 'Program' mode - which is fine since I never use it anyway, and is easier to use in manual. It does have two faster shutter speeds, 1/2000th and 1/4000th, neither of which I'm likely to use either. The matching needles in the viewfinder for manual mode metering is inspired, and much more intuitive and informative than the 'up a bit, down a bit' metering that many manual cameras, including the OM-1 and OM-2, use. And the sound of the shutter / mirror is remarkable. Much crisper than the OM-2, and as it turns our, a tad louder. It's probably purely imaginary but it sounds like good engineering.

This is the first grown-up Nikon I've owned; the Nikkormat doesn't count (and that was a really heavy camera). So a bit late in life (mine and that of film photography), I've been converted to Nikon!

I would still like to have an OM-5D; but my loyalty to Olympus has dissipated a little on discovering that in fact it wasn't the smallest, lightest SLR on the market. And as full-frame DSLRs become affordable, maybe at some point I'll get a Nikon.

The shutter sound    


Here's a recording of the two shutters. The first is the OM-1n (both OM-2s have film in), the second the FE2. Both were set to 1/250th of a second. The third and fourth pairs of firings show the wave form in Audacity.